
- Github clone link
- Goals
- Background
- Check Yourself
- Source
- RISC-V Emulator
- Part 1 Disassembler
- Part 2 Emulator
- Part 2 Debugging
- Testing
- Part 3 Custom Instructions
- Grading
- FAQs and Suggestions for TA
- Debugging hints
- TA Help
- Acknowledgments
Github clone link
Goals
- Enhance understanding the functionality implemented by a CPU
- Understand the inner workings of RISC-V instruction set design
- Prepare you to write RISC V assembly programs
- Understand how emulators work.
Background
In this project, you will create an emulator that is able to execute a subset of the RISC-V ISA. You'll provide the machinery to decode and execute a couple dozen RISC-V instructions.
A disassembler converts a binary code into a human-readable assembly program, while an emulator is a software model of a processor used to run programs that target a different CPU from the underlying hardware. Emulators are commonly used, and popular examples include Qemu. The software used to create virtual machines, such as the one you are using, is a type of emulator.
What is a disassembler and emulator ?
Check Yourself
- Bitfields and Unions
- The RISC-V ISA card provides some information necessary for completing this project.
- Lab 4/5 Video
- Do you know how to print in binary binary
WARNING: YOU CANNOT USE THE CODE IN VIDEO VERBATIM
i.e., You cannot keep video open in one window and
code in another window. Verbatim reproduction will be construed to be academic dishonesty
Source
Make sure you read through the entire spec before starting the project.
The files you will need to modify and submit are:
TODO
part1.c: The main file which you will modify for part 1.utils.c: The helper file which will hold various helper functions for part 1; as well as parsing the instruction. If you getparse_instructionwrong then part1 and part2 will print bogus values.part2.c: The main file which you will modify for part 2. You will not be submitting this file for part 1.
You will NOT be modifying any files other than the ones listed above. This means that you will not be modifying header files. If you add helper functions, please place the function prototypes in the corresponding C files. If you do not follow this step, your code will likely not compile and you will get a zero on the project.
You should definitely consult through the following, thoroughly:
types.h: C header file for the data types you will be dealing with. It is critical that you read and understand the definitions intypes.hbefore starting the project. If they look mysterious, consult the bitfields and unions ppt with this repo.Makefile: File which records all dependencies.code/input: Various files to run tests.code/ref: Reference outputs (_.solution - part 1 . _.trace - part 2)utils.h: File that contains the format for instructions to print for part 1.
You should not need to look at these files, but here they are anyway:
riscv.h: C header file for the functions you are implementing.riscv.c: C source file for the program loader and main function.
$ bash ./install-cunit.sh # Install unit testing framework. This will create a folder called CUnit/
$ make riscv
Command line Options
|-----|-----|
| -i| runs the simulator in interactive mode, in which the simulator executes an instruction each time the Enter key is pressed. The disassembly of each executed instruction is printed. |
| -t | runs the simulator in tracing mode, in which each instruction executed is printed. (if using t, don't use i) |
| -r | instructs the simulator to print the contents of all 32 registers after each instruction is executed. (Part 2) This option is most useful when combined with the -i flag.|
| -d |instructs the simulator to disassemble the entire program, then quit before executing. (Part 1)|
| -e | Part 2. Instructs the simulator to simulate till the end of the program (helpful when programs have loops)
RISC-V Emulator
The files provided in the start kit comprise a framework for a RISC-V emulator.
- In part 1, you will add code to
part1.candutils.cto print out the human-readable disassembly corresponding to the instruction's machine code. Look for/* Your Code */ - In part 2, you'll complete the program by adding code to
part2.cto execute each instruction (including performing memory accesses). Your simulator must be able to handle the machine code versions of the RISC-V machine instructions below. We've already given you a framework for what cases of instruction types you should be handling.
Check yourself: why does sizeof(Instruction)==4?
The instruction set that your emulator must handle is listed below. All of the information here is copied from the RISC-V green sheet for your convenience; you may still use the green card as a reference.

Just like the regular RISC-V architecture, the RISC-V system you're implementing is little-endian. This means that when given a value comprised of multiple bytes, the least-significant byte is stored at the lowest address.
Framework Details
The framework code we've provided operates by doing the following.
- It reads the program's machine code into the emulated machine's memory (starting at address 0x01000). The program to "execute" is passed as a command line parameter. Each program is given 1 MiB of memory and is byte-addressable.
- It initializes all 32 RISC-V registers to 0 and sets the program counter (PC) to 0x01000. The only exceptions to the initial initializations are the stack pointer (set to 0xEFFFF) and the global pointer (set to 0x03000). In the context of our emulator, the global pointer will refer to the static portion of our memory. The registers and Program Counter are managed by the
Processor structdefined intypes.h. - It sets flags that govern how the program interacts with the user. Depending on the options specified on the command line, the simulator will either show a dissassembly dump (-d) of the program on the command line, or it will execute the program. More information on the command line options is below.
It then enters the main simulation loop, which simply executes a single instruction repeatedly until the simulation is complete. Executing an instruction performs the following tasks:
- It fetches an instruction from memory, using the PC as the address.
- It examines the opcode/funct3 to determine what instruction was fetched.
- It executes the instruction and updates the PC.
Part 1 Disassembler
In part 1, you will be writing a disassembler that translates RISC-V machine code into human-readable assembly code. You will also be laying the building blocks for the actual emulator that you will implement in part 2. You will be implementing the following functions. The files in which they are located are in parentheses.
parse_instruction(instruction_bits)(utils.c): Uses the given instruction (encoded as a 32-bit integer) and returns the corresponding instruction. You will have to determine the proper format of the given instruction and use the correspdonding member of the instruction struct. You will find the green sheet particularly helpful here.sign_extend_number(field, n)(utils.c): This function interprets the number infieldas ann-bit number and sign-extends it to a 32-bit integer.get_*_offset(instruction)(utils.c): For the corresponding instruction type (either branch, jump, or store), this function unpacks the immediate value and returns the number of bytes to offset by. In this case of branches and jumps, these functions should return the number of bytes to add to the PC to get to the desired label. In the case of stores, the corresponding function will return the offset on the destination address.print_*(instruction)(part1.c): Prints the instruction to standard output. You should use the constants defined in the fileutils.hto properly format your instructions. Failure to do so will cause issues with the autograder. You should also refer to registers by their numbers and not their names.
Check yourself imm extraction
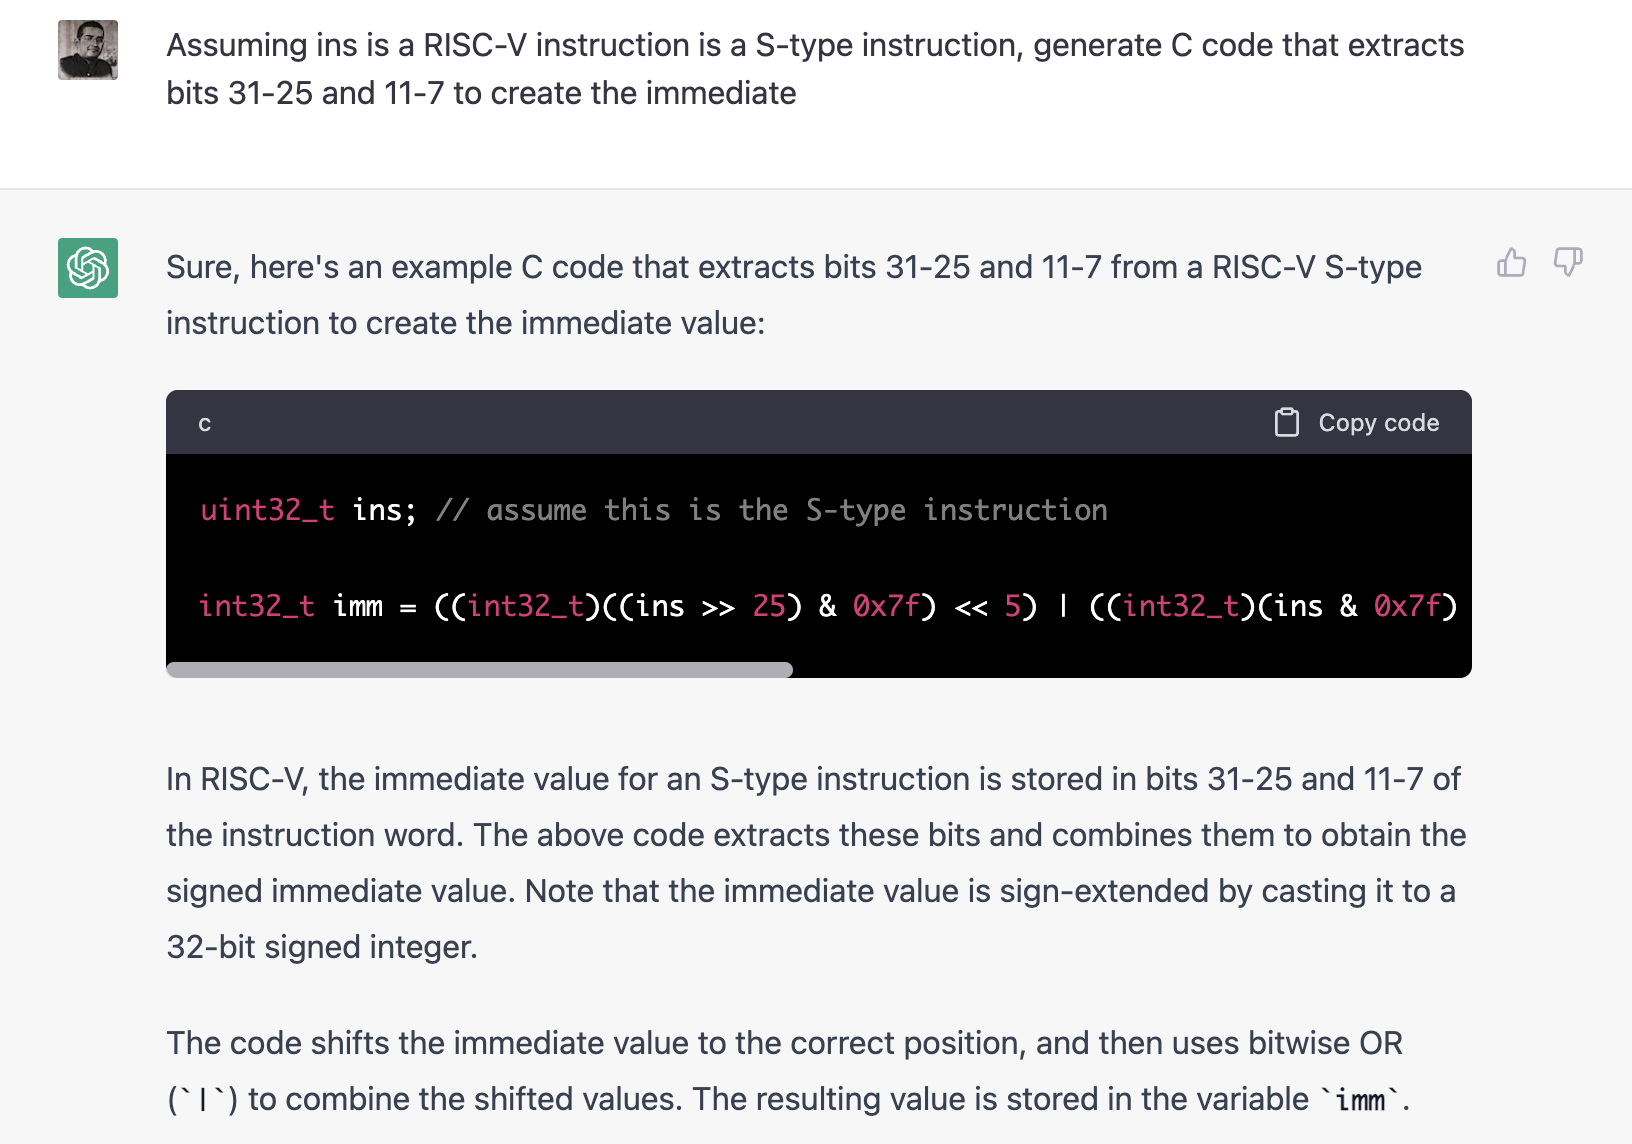
Instructions in RI5CY are 32 bits long. The immediate field in an instruction can be of different lengths, depending on the instruction type. For example, the 12-bit immediate in an sw (S-type) instruction is split into two parts: imm[11:5] and imm[4:0]. The immediate is sign-extended to 32 bits before being used in the instruction. Below is a concise explanation showing how you can extract the two parts of the 12-bit immediate in an sw (S-type) instruction using bit-shifts and the bitwise OR operator |, then sign-extend it if necessary.
1. Instruction Layout (S-Type)
  31         25 24    20 19    15 14   12 11     7   6      0
 +-------------+--------+--------+-------+--------+--------+
 | imm[11:5]   |  rs2   |  rs1   |funct3 |imm[4:0]| opcode |
 +-------------+--------+--------+-------+--------+--------+
- imm[4:0] = bits [11:7]
- imm[11:5] = bits [31:25]
When concatenated:
imm = { imm[11:5], imm[4:0] }
(12 bits total)
2. Extracting Fields with Bit Operations
We’ll treat instr as a 32-bit unsigned integer, instr[31:0].
-
Mask and shift to isolate the bits for
imm[4:0]:- Shift right by 7 to move bits [11:7] into bits [4:0].
& 0x1F(binary11111) to keep only those 5 bits.- imm_40 = (instr >> 7) & 0x1F; Mask: 0x1F = 0001 1111 (5 bits)
-
Mask and shift to isolate bits for
imm[11:5]:- Shift right by 25 to move bits [31:25] into bits [6:0].
& 0x7F(binary1111111) to keep only those 7 bits.- imm_115 = (instr >> 25) & 0x7F; Mask: 0x7F = 0111 1111 (7 bits)
-
Concatenate the two parts:
- Shift
imm_highleft by 5 (soimm_highwill occupy bits [11:5]). - OR (
|) withimm_lowto place bits [4:0]. - imm12 = (imm_115 << 5) | imm_40;
- Shift
ChatGPT Support
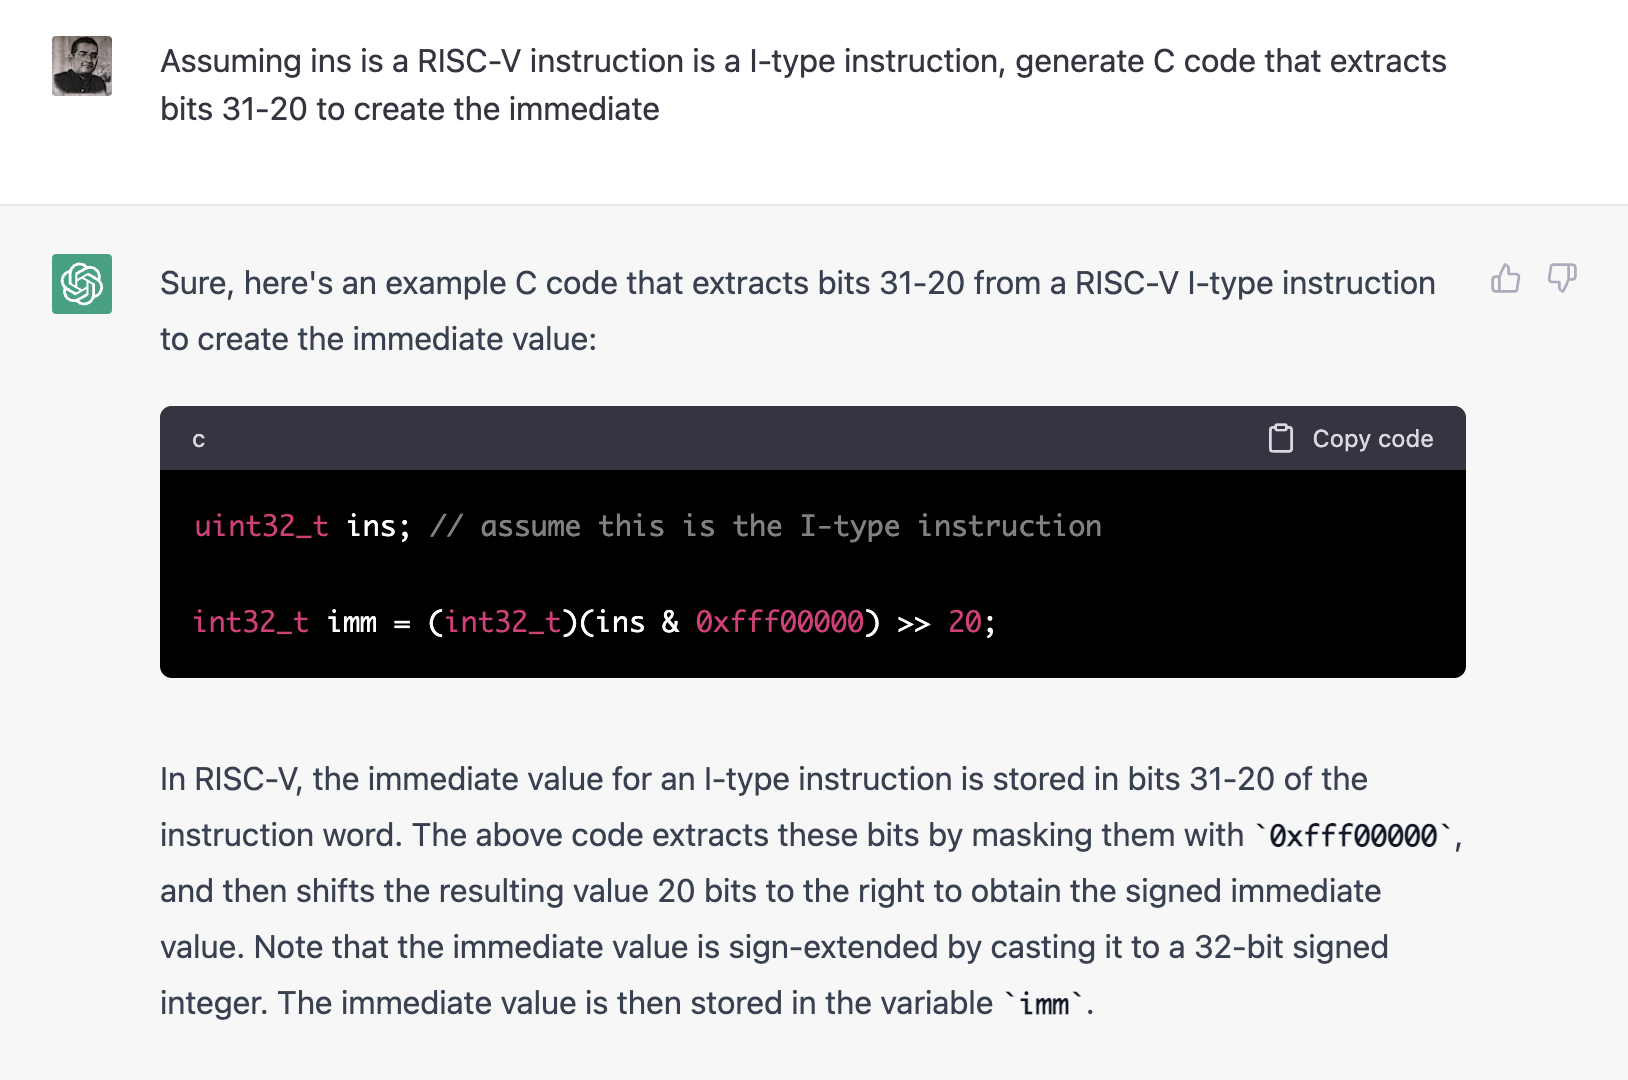
You can use chatgpt to help you with extracting fields from RISC-V instructions (instructions below come without any support; CMPT 295's syllabus is not about how to use ChatGPT). Here are a couple of sample queries. Things to watch out for:
- ChatGPT code may be incorrect cause you did not feed the appropriate bitfields. You should check the code it generates and the bit positions you wanted it to extract
- It only extracts the immediate but you may need to further shift it to get the actual offset (e.g,. Jump and Branch instructions)
- Double check the masks you are using to extract the bitfields. If the description is off it may extract an extra bit on either side of the field you want to extract.
Part 2 Emulator
For part 2 of this project, you will be implementing the actual emulator that can execute RISC-V machine code. In order to accomplish this task, you will need to complete the functions below. Program Counter PC and Program are loaded starting at 0x1000 (4096).
execute\_\*(): These functions handle the majority of the execution of the reduced RISC-V instruction set we are implementing in this project. To reduce the amount of busy work, the ladders of switch statements are already implemented for you. To complete the implementation, you will only need to fill in the switch cases. You should be updating the appropriate register values and interacting with memory when applicable.store(): This function takes an address, a size, and a value and stores the first -size- bytes of the given value at the given address.load(): This function accepts an address and a size and returns the next -size- bytes starting at the given address. You will need to implement load() first in order to fetch instructions properly; without a functioning load() you will get errors due to invalid instructions.
Note that a correct implementation of this part will depend on the functions in utils.c. Thus, you should ensure that these functions (which you wrote in part 1) are working correctly. By the time you're finished, your code should handle all of the instructions in the table above.
PC updates
The program counter (PC) register in the RISC V processor is special. It is a pointer to the memory location of the next instruction that will be run by the processor.
- PC itself is just a pointer. Every step the processor has to read the memory location pointed to by the PC. This requires you to implement the load() and read memory (atleast 4 byte loads. Think why implementing 4 byte aligned loads is sufficient for running instructions?)
- To make progress this has to be incremented or changed after running the current instruction. If it appears that your program is not making any progress e.g., it is stuck running the same instruction repeatedly then check whether you are updating the PC in
execute_*()functions. - The program counter is updated explicitly by branches (SB type), JAL (J type), and JALR (I type). These instructions include immediates that need to be extracted and sign extended. Make sure you pass part 1 and are able to disassemble these instructions appropriately; without this its futile to attempt part 2
- You may also need to do some arithmetic on the offset before setting the PC. This arithmetic may need you to read other registers (jalr) or even the PC itself (e.g., jal). Sometimes instructions may update the PC and other registers (e.g., JAL). Double-check the calculation of these immediates.
Part 2 Debugging
$ cgdb riscv
# Inside cgdb shell
$ run -t -r code/input/[*].input
$ run -t -r -i code/input[*].input # interactive emulator mode.
Testing
There are two types of tests for this project: unit tests, instruction tests, and end-to-end tests. The unit tests can be found in the file test_utils.c. This suite tests the sign_extend_number and parse_instruction functions. You can run these tests using the command below.
Unit tests
$ touch test_utils.c; make test-utils
If you see any build errors; check if you have run the CUnit install at the beginning.
$ bash ./install-cunit.sh # Install unit testing framework. This will create a folder called CUnit/
Instruction tests
Setup
bash ./scripts/localci.sh
# This will create the code/out folder.
# This is required for further testing below.
# This will also create files; make sure you overwrite them with
# the steps below before looking at them. Otherwise the .trace
# files in code/out/ might be stale.
YOU CAN ONLY READ (NOT MODIFY) THE FILES IN code/input and code/ref. HOWEVER YOU CAN UPDATE THE FILES in code/out. DO NOT GIT ADD code/out; OTHERWISE YOU WILL FAIL travis
Part 1
$ ./riscv -d ./code/input/R/R.input > ./code/out/R/R.solution
$ diff ./code/out/R/R.solution ./code/ref/R/R.solution
# You can replace R with any of the other instruction types R, I, S, SB, U, J
Part 2
$ ./riscv -t -r ./code/input/R/R.input > ./code/out/R/R.trace
$ python3 part2_tester.py R/R
# If there is any error, check if code/out/R/R.trace exists ?
# The python script will report errors in particular traces points if any.
# You can replace R with any of the other instruction types R, I, S, SB, U, J
# Ls are also in I/ folder as they are type of I
$ ./riscv -d ./code/input/I/L.input > ./code/out/I/L.solution
$ diff ./code/out/I/L.solution ./code/ref/I/L.solution
$ ./riscv -t -r ./code/input/I/L.input > ./code/out/I/L.trace
$ python3 part2_tester.py I/L
If your trace does not match the output, you will get the difference between the reference output and your output. Make sure you at least pass this test before modifying part1.c
R with init
SPECIAL TEST CASE FOR R instructions ONLY
Ri IS NOT A SPECIAL INSTRUCTION TYPE.
Part 2 needs to check actual values in registers. To help we add an additional flag to help test R instructions. In this case we initialize registers (other than sp:x2 and frame pointer:x3 ) to 4. Notice the Ri. This is to indicate we are using the inited version of the CPU.
# Ri.input is same as R.input. But the -v flag inits the registers to 4. If you leave out the -v then your
# trace will not match
./riscv -v -t -r ./code/input/Ri/Ri.input > ./code/out/Ri/Ri.trace
$ python3 part2_tester.py Ri/Ri
# You get points for R instructions: part 2 only if you pass the Ri part 2.
Part 2 tests need to check the actual values in the registers. Program tests are the recommended method for debugging Part 2.
Program tests
# The possible test files are called simple, multiply, random.
$ ./riscv -t -r -e ./code/input/simple.input > ./code/out/simple.trace
$ python3 part2_tester.py simple
# Replace simple with multiply or random
An example error output
$ ./riscv -t -r -e ./code/input/random.input > ./code/out/random.trace
$ python3 part2_tester.py random

Starting random test
ERROR: instruction 10, register 5. Expected: 0x00000000, Actual: 0xffffffff
random test has failed.
You are provided with three test files that evaluate your emulator's correctness. The output files are those with the .trace extension. The solutions are located in the folder code/ref, while your project's code will write it's output to the folder code/out. These trace files dump the contents of the registers after the execution of each instruction.
The testing suite is run through the python script part2_tester.py. This file will read in your output and compare it against the reference trace by looking at changes in the registers between instructions. If a test fails, you should see an output that lists which instruction and register was incorrect. You can then cross-reference this information with the tests' .solution file (the disassembled version from part 1) to find the erroneous error.
If you would like to add new tests, you should follow the same steps as those outlined when creating tests for part 1. The only difference is that you need to create a .trace reference file that contains the register values after every instruction
End-to-End tests
Congratulations! You are ready for end-to-end tests
$ bash ./scripts/localci.sh
# if you see a file called SUCCESS in your repo and *.log.sucess then you passed. You can also check your *_Grade.json to see your tentative grade.
# If you see FAILED, then inspect *.log.failed. Check the failed section in LOG.md to see what tests failed.
# LOG.md is a markdown file. You can view it using any markdown viewer.
# Copy paste LOG.md into this viewer e.g., https://markdownlivepreview.com/
Part 3 Custom Instructions
DO NOT ATTEMPT THIS WITHOUT COMPLETING PART 1 and 2
The RISC-V ISA enables the designer to customize and extend the ISA. It reserves bits in the opcode space so that designers can define new operations. We are going to add support for a custom instructions.
if MEM[rs1] < rs2:
    MEM[rs1] = rs2
rd = MEM[rs1]
In programs, custom load-modify-store is pretty common operation i.e., the instruction performs both a load and a store. The address is stored in rs1 (assume offset is effectively 0). The instruction operations are as follows: First, it loads the value at in MEM[rs1]. Then, it compares the value with rs2. If the value in memory is less than rs2, it stores rs2 in the memory location. Finally it returns the smaller value in rd.
| Instruction | Type | Opcode | Funct3 | Funct7 | Operation |
|---|---|---|---|---|---|
| lswc rd,rs1,rs2 | R | 0x2a | 0x1 | 0x0 | if (MEM[rs1] < rs2) MEM[rs1] = rs2, rd = MEM[rs1] |
We are going to add one such new instruction to our disassembler (part 1) and emulator (part 2). You may need new or modify existing functions in part1.c, part2.c, utils.c.
# The test file is custom
$ ./riscv -d ./code/input/custom_lswc.input > ./code/out/custom_lswc.solution
$ diff ./code/out/custom_lswc.solution ./code/ref/custom_lswc.solution
$ ./riscv -t -e -r -s ./code/input/lswc_data.input  -a 0x8,0x3000 ./code/input/custom_lswc.input > code/out/custom_lswc.trace
$ python3 part2_tester.py custom_lswc
We have added two more options to the riscv emulator.
| Option | Description |
|---|---|
| -s | Loads data from the file into the memory starting at 0x3000. |
| -a | loads argument registers starting at a0. e.g., -a 0x8,0x3000 means set a0=0x8 and a1=0x3000 when program starts up |
Grading
Congrats. You are now ready to receive your tentative grade.
$ cd $REPO # $REPO refers to the top of your cloned repo.
$ bash ./scripts/localci.sh # run from the repo folder
# Check if SUCCESS OR FAILED was dumped by scripts
# There will be a _Grade.json (this is your tentative grade). The file is in json format.
# The mark component in each module indicates your score for that portion.
# LOG.md contains the log of your runs. This might give you more information.
This grade is only tentative. Based on additional test cases in our evaluation, you could score less points.
| Test | P1 Points | P2 Points |
|---|---|---|
| R | 12 (rpart1) | 0 (rpart2) |
| Ri | 0 (rpart1) | 12 (rpart2) |
| I (Ls are also included) | 24 (ipart1) | 24 (ipart2) |
| S | 12 (spart1) | 12 (spart2) |
| SB | 12 (sbpart1) | 12 (sbpart2) |
| U | 12 (upart1) | 12 (upart2) |
| J | 12 (ujpart1) | 12 (ujpart2) |
| Simple | 30 | 30 |
| Multiply | 30 | 30 |
| Random | 30 | 30 |
| lswc | 30 | 120 |
FAQs and Suggestions for TA
- What does union and bitfield mean?
- What is
struct Instruction? - What is
struct Processor? - What is
MEMORY_SPACE?
Debugging hints
{: .table-striped .table-bordered }
| Symptom | What you should check |
|---|---|
| Branch and Jump offsets are incorrect | Check the fields extracted against the example shown here. (https://cmpt-295-sfu.github.io/website//hw/hw2_debug.html) |
Invalid instructuctions in part 2. Passed part 1 though |
Check your load():line 450 in part2.c loads() of words need to function correctly for instruction fetch to work. Also see lab 5 video |
Running (-r) does not seem to make progress. |
Check your program counter. Program counter needs to be updated on each step |
| Register values appear wrong in programs | Check your arithmetic instructions (if those appear correct), then check your load addresses in load():line 450 part2.c, followed by memory values |
ERROR: student trace finished before reference trace |
Pass -e when running part2. Also check to ensure you have handled all op cases |
Instruction execution mixed up. SRLI shifts but then also adds 1 |
Check if a break statement is missing in switch case |
| Segfault error due to reading past instructions | See if you are passing -e option when running code. It should be used only for simple,multiply,random |
| Having trouble with jump instructions | Read (https://cmpt-295-sfu.github.io/website//assets/notebooks/RISCV/riscv-harry.pdf) page 71-74 |
| Having trouble with shifts | Check the actual shift values you see and compare against the instructions in ref/*.solution. Also read (https://cmpt-295-sfu.github.io/website//assets/notebooks/RISCV/riscv-harry.pdf) - Page 54 |
| Having trouble with loads and stores (multiple bytes) | Check if you are reading the appropriate bytes and sign extending it. Also read (https://cmpt-295-sfu.github.io/website//assets/notebooks/RISCV/riscv-harry.pdf) - Page 78 |
| Every instruction mismatches for program and custom | Check if you have included -v and -a flags to initialize registers |
TA Help
We have a strict 'No Print No Help` policy. Please refer to the policy and assignment page. Here is a suggested list of things to print for this assignment before you show up to a TA meeting
- PC and register values
- If you are asking about jumps, shifts etc then the fields of the ISA have to be printed in binary
- For load and store you have to print out
address,byte, ` of memory locations print_bytes
Acknowledgments
This assignment has been modified the CMPT 295 instructor.